
My serpentine belt is too short and won’t go on
Belts and Tensioners
This is one of the most common calls we get after a serpentine conversion. In almost every case the belt is the right one. It is just sized much tighter than you are used to.
Overview
Short Answer
Your CVF belt is supposed to be extremely tight going on. We size belts by where the tensioner sits after the belt has run and taken its initial stretch, not by how easy the belt is to install. Follow the tech tip in your kit instructions rather than reaching for a longer belt.
Why the belt feels too short
A serpentine belt is not sized for a comfortable install. It is sized so that once the engine has run and the belt has gone through its initial stretch, the tensioner arm settles in the correct part of its travel, lined up within the indicator marks on the tensioner body.
That is the measurement that matters to us when we specify a belt. Ease of installation is not part of it. Every belt goes through an initial stretch in its first hours of running, and where the tensioner lands after that stretch is what determines whether you have tension control for the life of the belt.
If we sized belts so they slipped on easily by hand, the tensioner would sit at the wrong end of its range once the belt broke in, and you would run out of adjustment long before the belt was worn out.
What to do before you buy a longer belt
Find the tech tip in your installation instructions. Every serpentine kit ships with a routing and install tip for getting the belt on. It is the step most installers skip.
Route the belt with the tensioner fully relieved. Use the tensioner’s square drive and hold it at the end of its travel while you seat the last pulley.
Check the belt against your pick list. Read the part number molded into the belt and compare it against the pick list in the box. If the two do not match, that is your answer and you do not need a longer belt. If they do match and it still will not go on, send us the belt number with your order number and we can confirm in seconds whether the belt specified for your configuration is the one that shipped.
Don’t judge the belt by how hard it is to get on. A belt that takes real effort to seat is behaving normally. Judge it by where the tensioner ends up after the engine has run.
The alternator pulley trick
This is the one from our install instructions, and it is what gets most belts on when brute force will not. Do it with two people if you can.
- Remove the alternator pulley cap and the nut that holds the pulley onto the alternator, and take the pulley off.
- Place the belt around the alternator pulley while it is off the alternator.
- Release tension on the tensioner, then slide the alternator pulley onto the alternator shaft, using the pulley itself as additional leverage to bring the belt on.
- Once the belt is on, reinstall the nut and all of the decorative caps.
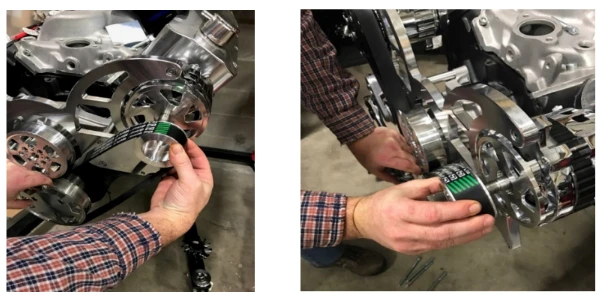
Belt around the pulley first, then the pulley onto the shaft.
If the belt is not right for your kit
Belt length is specific to your accessory layout, so the first thing we do is pull up your configuration. Send us:
- your order number and the email used at purchase
- the part number printed on the belt you received
- a photo showing the belt routed as far as it will go
We will confirm the correct length for your setup and get the right belt to you. You can also see every length we stock, with its Gates part number, on our 8 rib serpentine belts page.
Heads up
Belt length depends on how your kit is configured. If anything about the kit changed after you bought it, mention that when you write in.
Watch it on video
How to measure for the right belt rather than guessing at a length.
How to Measure and Find the Right V-Belt Size — CVF Racing on YouTube
Still need help? Our tech support team can get you pointed in the right direction.
Contact Support