
How do I adjust my hood hinges?
Hood Hinges
Every CVF hood hinge kit has three separate adjustments, and each one moves the hood in a different direction. Knowing which is which turns a frustrating afternoon into a ten minute job.
Overview
Short Answer
Three adjustments: set screws move the hood straight up and down, cam buttons shift it left and right, and the turnbuckle changes the angle the hood sits at. Make small changes, check after each one, and always ease the hood down rather than forcing it.
Read this first
Always ease the hood down until it is adjusted properly. Never force it down. Use blankets, fender protectors and tape to keep your paint pristine while you work. A hood forced onto a misadjusted hinge can damage paint, sheet metal and the hinge itself.
Before you start
Photograph or video your panel gaps before anything comes apart. When you are dialling the hood back in, that is what tells you where you are trying to get back to, and it is very hard to reconstruct from memory once the hood is off.
Put a couple of layers of tape along the edges of the hood and the fenders. Every adjustment means easing the hood down again to check it, and taped edges are what keeps those checks from chipping paint.
Set your starting positions before the hood goes back on. Check that both turnbuckles are close to the same length, and set the hinge height adjustment somewhere in the middle of its range so you have room to move up or down later. Leave the hinge, cam button and hood hardware snug but not torqued, because you need the wiggle room.
The three adjustments
All CVF Racing hood hinge kits come with multiple tools to get your hood perfectly aligned. Here is what each one does.
| Adjustment | What it moves | Reach for it when |
|---|---|---|
| Set screws | The hinge straight up and down | The hood sits too high or too low in all locations |
| Cam buttons | The hood left and right | The hood is off center, or contacting a fender. Most often at the top of the hood near the windshield |
| Turnbuckle (adjusting rod) | The angle the hood sits at | The hood is high or low at one end rather than all over |
Set screws: up and down
The set screws are what let you shift the hinge straight up and down without taking the hood back off. During install you run them down until they touch the bolts holding the hinge to the fender, and from then on they are your height adjustment.
If the hood sits high or low everywhere, rather than at one end, this is usually the simple adjustment you need.
Cam buttons: left and right
The cam buttons allow the hood to shift left or right. The most common place this shows up is at the top of the hood near the windshield, where the hood comes into contact with a fender. Small movements of the cam buttons correct it.
Three rules matter here, and they are the ones people skip:
- Always use minor adjustments and check the results.
- Carefully ease the hood down to check your clearance on both sides.
- Extreme adjustment on only one side while the other is tight can twist the hinges when the hood is in the open position.
Which way to turn the cam
The cam moves the hood the opposite way to the direction you rotate it. If you want the hood to move toward the driver side, rotate the cam so the hex hole faces toward the passenger side. That reversal catches almost everyone the first time.
When you adjust the first side, there is a good chance the hinge moves and the hood does not. That is the hinge going into a bind rather than the adjustment failing. Go and make the same adjustment on the other side and the hood will move. Adjusting one side on its own is what leaves the hood out of square and loads one hinge harder than the other, so every change you make should be made equally on both sides.
Orientation matters as much as height
Beyond how far each button is screwed in, the buttons have to point the right way. The front and rear buttons on each side need to point in the same direction, and both sides need to match each other.
Buttons that disagree leave the hinges slightly twisted, which puts extra pressure into the hinge and its hardware every time the hood moves. That is the most common cause of binding. Page 2 of the Universal Hood Hinge Install Instructions has the cam button position reference.
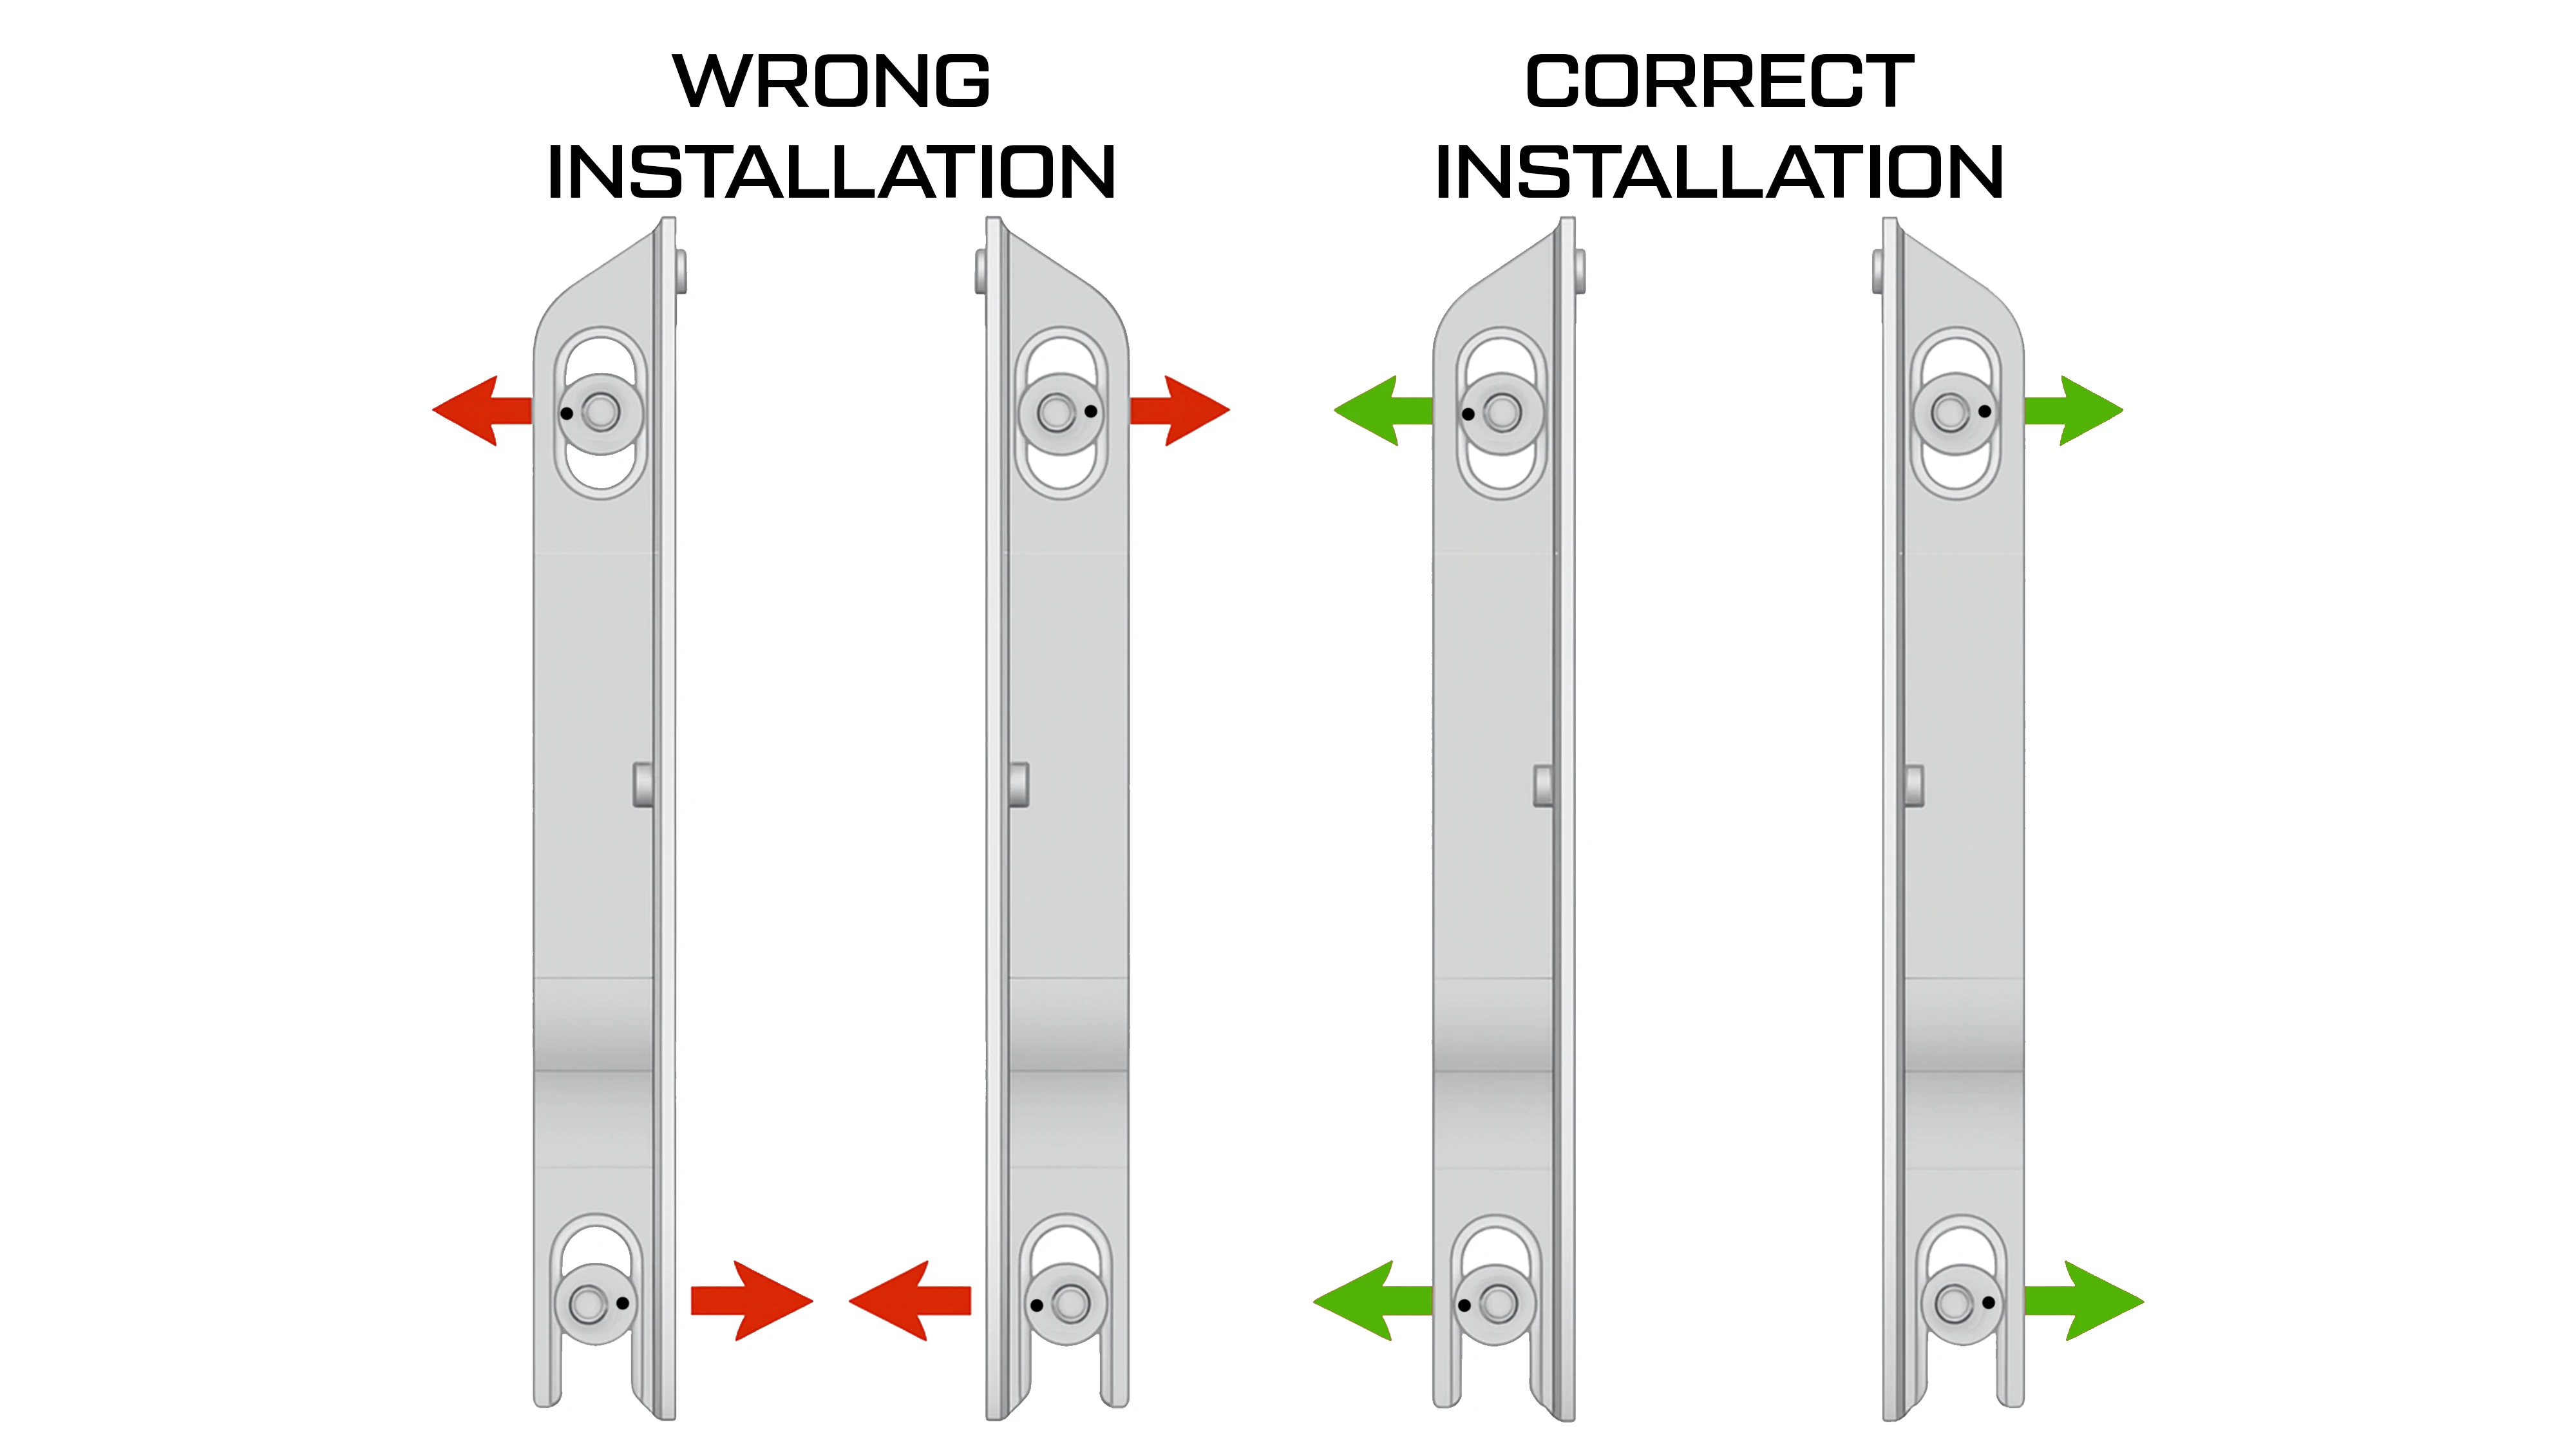
Cam buttons have to run parallel. One angled in and one angled out is what puts the hinge in a twist.
Turnbuckle: the one that does the most
The turnbuckle, also called the adjusting rod, is most often the cause of alignment issues. Even the slightest adjustment to it can drastically affect where the hood sits.
All CVF hinges ship with the turnbuckle extended close to where you will need it, but further adjustment once installed is likely required. Two things follow from that. Expect to adjust it even though it arrives close, and go in small increments, because a fraction of a turn moves the hood more than you would expect. Keep both sides matched unless you are deliberately correcting a difference between them.
Torque the pivots before you chase alignment
Loose pivots move under load and undo your adjustments, and they put extra load on the turnbuckle bolts. Torque the main pivot bolts on both hinges to 38 ft/lbs before you start fine tuning anything.
Check both sides against each other
Two measurements are worth confirming before you call the job done, and both are about the two hinges matching.
- Adjustment rod length. Both rods must be set to the same length. If they are not, the hinges do not share the load evenly, and that is what leads to bolts pulling through, threads stripping at the mounting points, adjustment rods shearing and brackets breaking. If your kit has a preset spec, use it as the baseline. Never run mismatched rod lengths side to side.
- Hinge position. The distance between the OEM mounting holes should match your final measurement between the cam button bolts. If those two numbers disagree, the hinge is not sitting where the hood expects it to.
Once the gaps are where you want them and both sides check out, torque down all of the hardware.
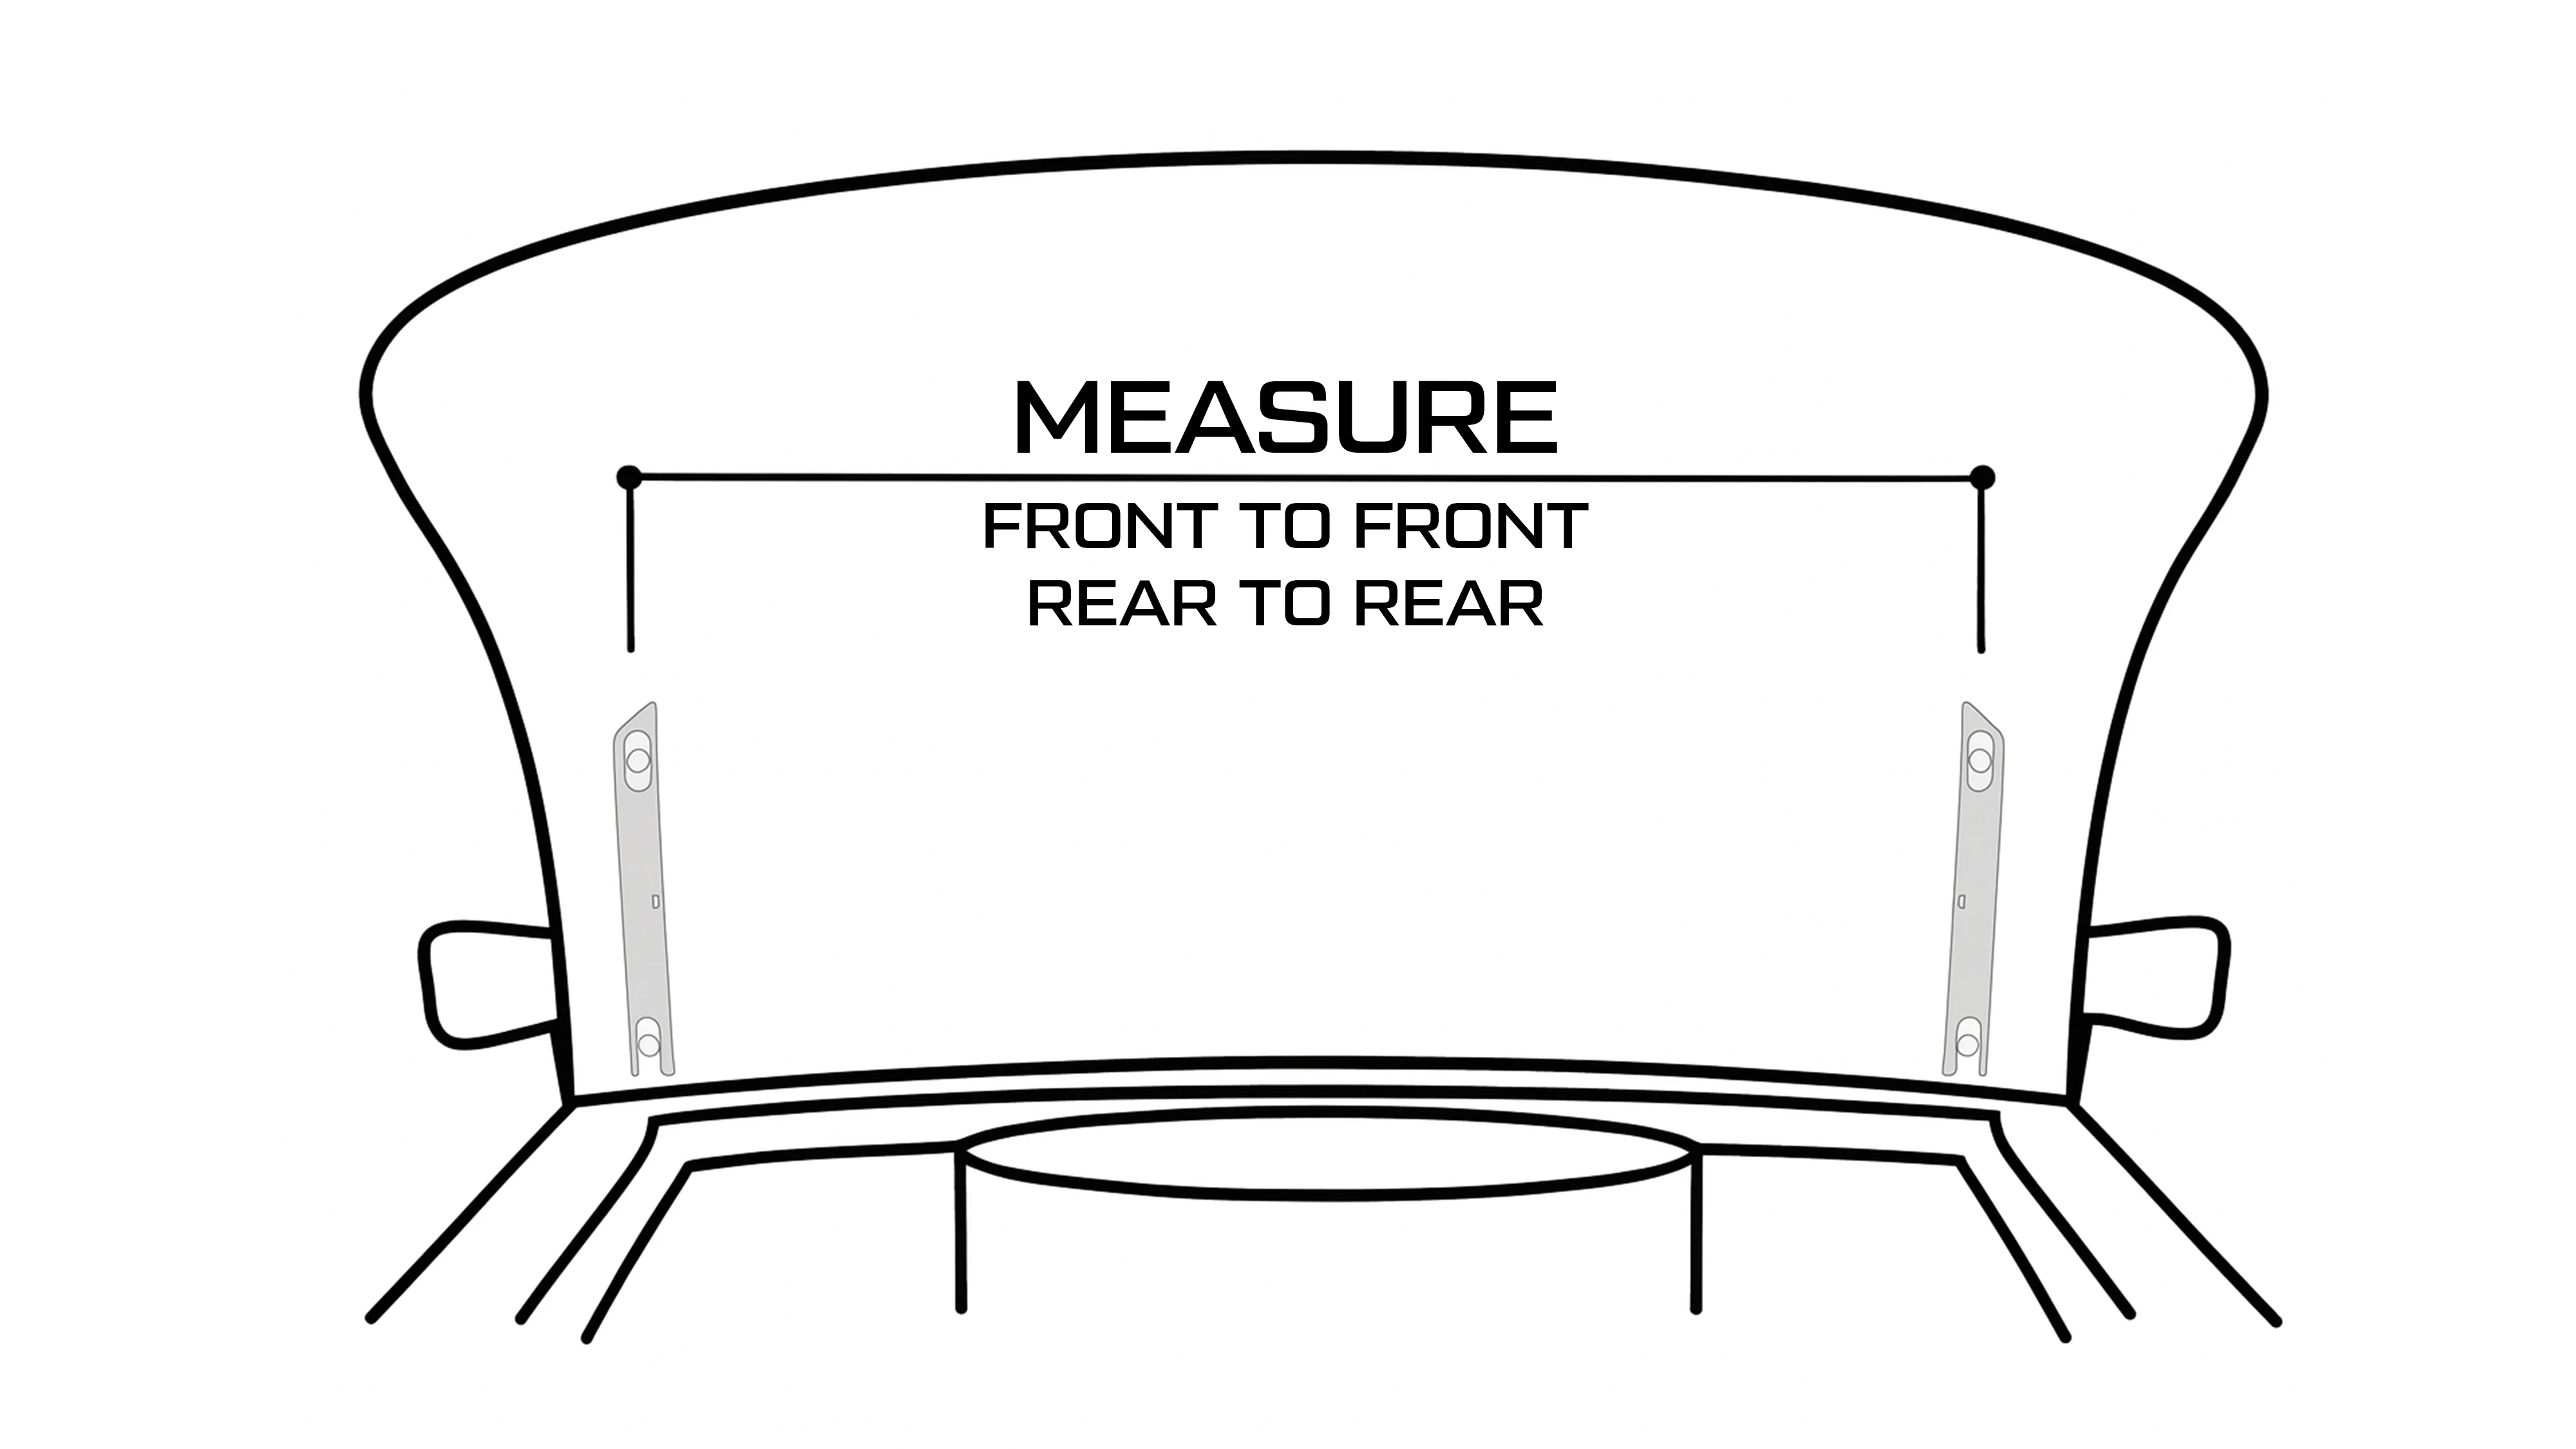
Measure front to front and rear to rear. If they do not match, the hinges are toed in or out.
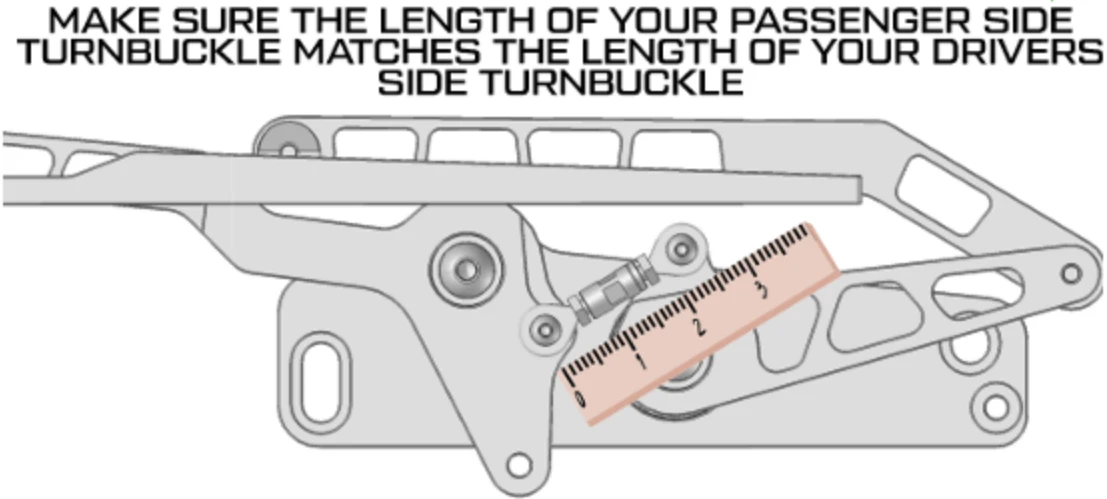
Measure both turnbuckles. The passenger side has to match the driver side.
The written instructions and videos
The full procedure, with photos of each step, is in the Universal Hood Hinge Install Instructions. The two videos below show the same adjustments being made on a real car, and they are worth watching before you start.
CVF Hood Hinge Installation Tips — CVF Racing on YouTube
Why Billet Hood Hinges Are a Must — 1966 Chevelle Install and Setup Tips — CVF Racing on YouTube
Working alone?
Every check in this process involves easing the hood down to see where it lands. A second set of hands makes that safer and faster. If you are on your own, take it in very small steps.
Still need help? Our tech support team can get you pointed in the right direction.
Contact Support